This one is a quickie! I’ll go over what pf is and how to use it. Don’t be afraid, pf is very easy to use!
What is pf?
pf stands for Packet Filter. It’s the firewall on FreeBSD. It’s very simple to configure given that it has macros. Using pf, we can restrict and regulate the traffic that passes through our machine.
Note: pf on FreeBSD is different from pf on OpenBSD. This article is FreeBSD specific and likely will not transfer verbatim to OpenBSD.
Finding our macros
Open /etc/services in your favorite editor (or just cat+grep it). Look for the services you want and write them down. Mine include the following: ssh, http, https, ntp, domain
If you cannot find a macro, don’t worry. You can always set a port without a macro.
Writing the config file
Edit /etc/pf.conf in your edior of choice.
In order to save resources, we can set skip on the loopback device. If you are unaware, the loopback device is a virtual network device that your machine uses to send traffic to itself. Since we trust localhost to send and receive packets from localhost, we will tell pf not to worry about filtering traffic on lo0.
Remember the macros from a few seconds ago? Now we’ll turn them into variables and apply a rule set.
# skip the loopback device
set skip on lo0

# define our variables
tcp_services = "{ ssh, domain, http, https, ntp }"
udp_services = "{ domain }"

# block all incoming traffic by default
block in all

# allow our variables to accept traffic in
pass in proto tcp to any port $tcp_services keep state
pass in proto udp to any port $udp_services keep state

# pass all traffic out
pass out all
Testing and enabling pf
You must be careful at this step or else you might end up locking yourself out of your server. Before enabling pf, we’ll test it with a clever shell command. This command will start pf, wait 60 seconds, then stop pf again. 60 seconds is enough time for me to open a second terminal and attempt to ssh back in. Adjust according to your own network speeds.
$ service pf onestart; sleep 60; service pf onestop
If you are better at typing than me, you will not see any syntax errors. After verifying that you did not lock yourself out, it’s time to enable and start pf.
$ sysrc pf_enable=yes
$ service pf start
Double checking with nmap
Using nmap we can very quickly verify if our rules worked. Install nmap both on your local machine and on your remote machine.
On the local machine we will scan the IP of the remote machine. On the remote machine we will scan localhost. Then, we will compare the two results.
$ pkg install nmap

# remote machine
$ nmap localhost

# local machine
$ nmap your.server.ip.here
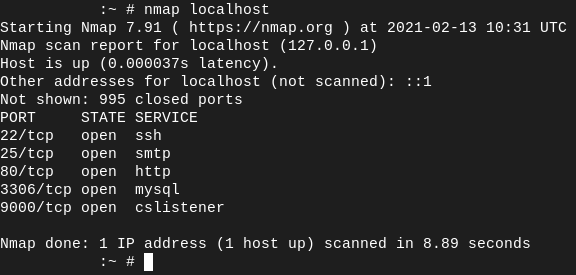
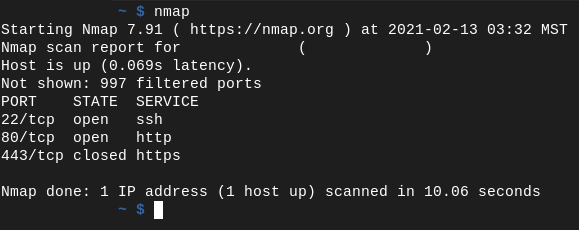
Below I have included my results. The first image was ran on my server and the second image was ran on my desktop at home. If we look closely, we can see that the two differ quite a bit. From the server, it appears that ports 22, 25, 80, 3306, and 9000 are open and have a daemon listening on them. But, from the outside internet, only ports 22, 80, and 443 are open.
Conclusion
I hope this can help anyone who still feels a bit intimidated. This is a very basic use case for pf . . . but it can do so much more with it if you’re willing to learn. Overall, I quite like pf. Maybe someday I’ll try to build a firewall appliance with it.
 Monero:
  Bitcoin:
  http://ilsstfnqt4vpykd2bqc7ntxf2tqupqzi6d5zmk767qtingw2vp2hawyd.onion:8080
 http://xzh77mcyknkkghfqpwgzosukbshxq3nwwe2cg3dtla7oqoaqknia.b32.i2p:9090
  |
|