OpenBSD VM on a plan 9 host
I am back to playing with 9 again. It’s been a while since I last touched the system because I have been very busy. I am still wondering if I can get a ‘modern’ web browser running so that I can proceed with the nearly 5 year old idea of running 9 exclusively.
The state of web browsers in 9 hasn’t really evolved since it’s inception so the only foreseeable solution is to virtualize a more “modern” operating system with support for things like firefox so I can do the big boy tasks like “paying the mortgage” and so on and so forth.
But it’s not all virtualization and cream
One of my favorite things about virtualization (emulation) on 9 is that a guest can crash the host. When this occurs the host’s filesystem will become corrupted you will need to manually clean things up. 9 doesn’t seem to have a good/any OOM to prevent this from happening.
From vmx(1)
BUGS
          Vmx can and will crash your kernel.

          Currently only one core is supported.

          The Linux vga= option is not supported, as well as many of
          the OpenBSD boot variables.
Setup
The setup steps for installing OpenBSD are only marginally more complicated than the average user is used to. The most difficult part of the entire setup is figuring how to boot the system when it doesn’t want to boot.
get files
In order to boot the system we need 3 files: a .fs or .img OpenBSD installation image, the bsd.rd kernel, and the regular bsd kernel. I have no intention on trying to get the bsd.mp kernel working as there is no multithreading in vmx(1).
bsd.rd comes gzipped so it must be extracted before use
term% hget https://cdn.openbsd.org/pub/OpenBSD/7.3/amd64/install73.img > install73.img
term% hget https://cdn.openbsd.org/pub/OpenBSD/7.3/amd64/bsd.rd > bsd.rd
term% hget https://cdn.openbsd.org/pub/OpenBSD/7.3/amd64/bsd > bsd
term% file bsd.rd
bsd.rd: gzip compressed
term% gunzip -c bsd.rd > bsd-unziped.rd
term% file bsd-unziped.rd
bsd-unziped.rd: AMD64 ELF executable
Installation
Before proceeding with installation, a virtual disk must be made. In this example I created a disk with a capacity of 20G.
term% dd < /dev/zero -of openbsd73-disk.img -bs 1 -count 1 -seek `{echo 20*1024*1024*1024-1 | pc -n}
The next step is to boot the ramdisk kernel (bsd.rd) and attach the install73.img filesystem and the openbsd73-disk.img virtual block device. The installation procedure is largely standard.
term% vmx -d openbsd73-disk.img -d install73.img -n ether0 -v vesa:640x480 bsd-unziped.rd
When the vm starts it will swallow the shell window.
The command flags are fairly self explanatory but I will proceed with verbosity.
-dspecifies a “disk”. This can be a disk image or a physical hard drive. I specified 2: the drive I want to install to then the disk image that contains installation files.-nspecifies a networking device. On my system ether0 is the rj45 port and ether0 is my wireless card. To avoid potential problems I decided to place the host and guest on separate devices. Do not fall for the POE scam. It’s way too slow.-vsets a graphics device and a virtual PS/2 keyboard and mouse are automatically attached to the guest. vesa:XxY specifies a screen resolution. Not all guests will support this.
The final argument is the kernel to load. vmx(1) is strange in that it loads a kernel directly instead of going through a bootloader.
If OpenBSD panics, try re-running with the -M 1G flag to increase the memory available to the guest. The default is 64M and this isn’t quite enough to do memory intensive processes.
The rest of the installation procedure is easy if you remember to (H)alt instead of (R)eboot.
I also did not start xenodm by default in the case that X refuses to start for some reason. I manually start xenodm every time I start the guest. Console is king.
Running the guest
After the guest is installed it can be ran (almost) like a normal system. Again, the shell window will be swallowed.
term% vmx -M 1G -n ether0 -d openbsd73-disk.img -v vesa:640x480,1024x768 bsd 'db_console=on'
In contrast to the installation steps: the bsd kernel is being loaded and we are passing it the argument of db_console=on which will allow acces to the kernel debugger.
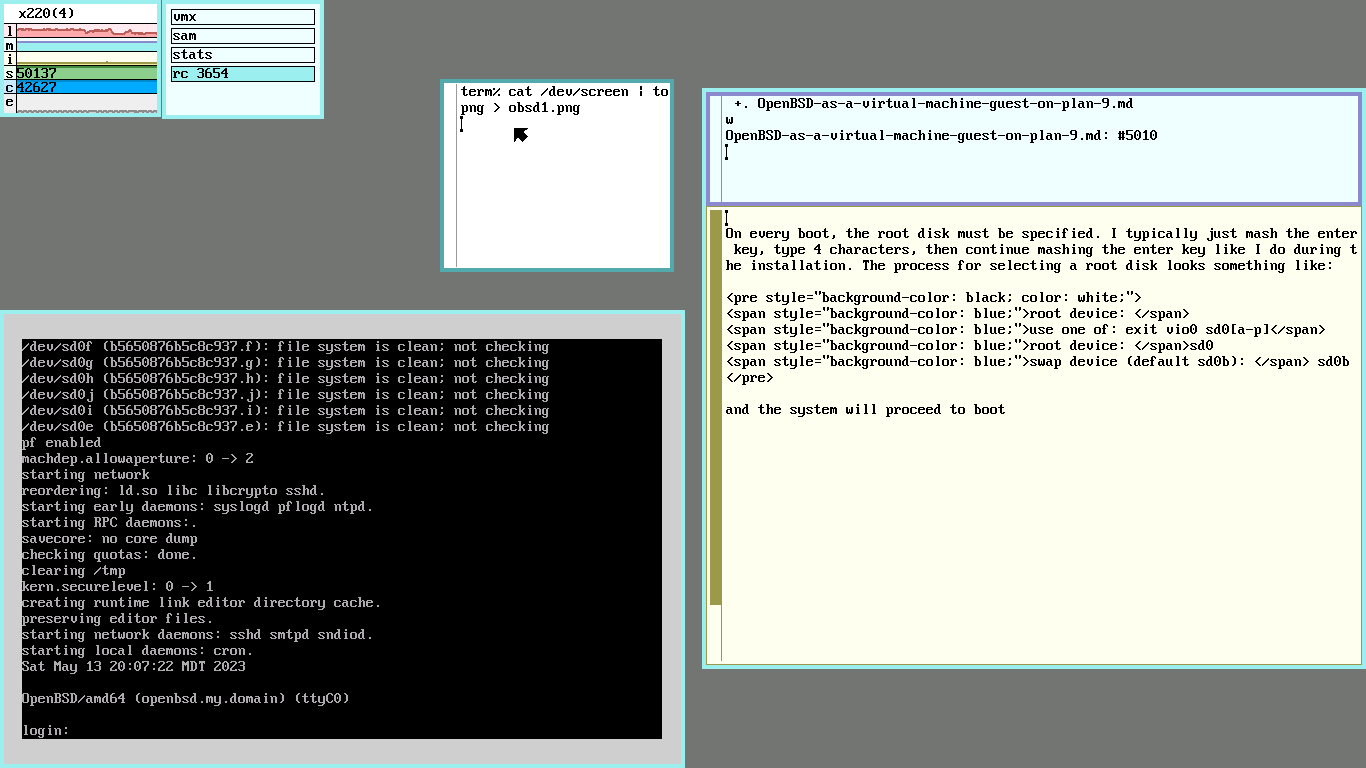
On every boot, the root disk must be specified. I typically just mash the enter key, type 4 characters, then continue mashing the enter key like I do during the installation. The process for selecting a root disk looks something like:
root device:
use one of: exit vio0 sd0[a-p]
root device: sd0
swap device (default sd0b):  sd0b
The system will proceed to boot to a console. After booting, log in and start the xenodm service.
openbsd# rcctl -f start xenodm

Stopping the vm
This should be fairly intuitive. In the guest:
openbsd# halt
Press left control+alt to release the cursor then, on the host, run:
term% kill vmx | rc
 Monero:
  Bitcoin:
  http://ilsstfnqt4vpykd2bqc7ntxf2tqupqzi6d5zmk767qtingw2vp2hawyd.onion:8080
 http://xzh77mcyknkkghfqpwgzosukbshxq3nwwe2cg3dtla7oqoaqknia.b32.i2p:9090
  |
|